- HubPages»
- Home and Garden»
- Home Decorating»
- Wall Decor & Artworks
Creating a Gallery Wall On a Budget

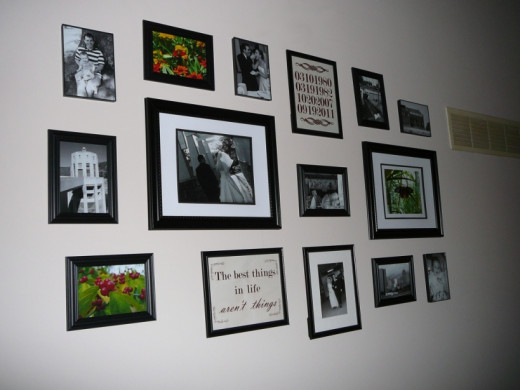
Gallery walls are a fantastic way to decorate in your house while displaying photographs or pieces of artwork that you love. They
- allow you to display several of your favorite photos or art pieces instead of having to choose just one
- can nicely fill a large empty space on your wall
- can fit in just about any budget
This is a how-to article that describes how I built my own gallery wall for a little less than $50.
Step 1: Designing The Layout
The first step I took to create my gallery wall was to design it in detail. I covered most of the details behind my approach to designing my gallery wall in a previous article.
Since I used free resources for my gallery layout inspiration, and then designed the details on my gallery wall on the computer, I didn't have any expenses associated with this step.
Total cost of design: $0.

Step 2: Finding the Frames
After designing my gallery, I knew what sizes of frames I needed. I also knew I needed frames with different border widths. Since I was building my gallery wall on a budget, I intentionally chose very common frame sizes with reasonable border widths for each size during the design phase. I also intentionally left a bit of a margin around the pictures in my design so that I could be satisfied with frames that were close to, but not exactly, the specified size.
On my list were four different types of frames:
- Two 11x14 frames with a 1"-2" border width. I planned to use a mat in these frames and put 8x10 photos in them.
- Three 8x10 frames with a 1"-1.5" border width.
- Six 5x7 frames with a .75"-1" border width.
- Four 5x7 frames with a very thin (almost non-existent) border. I actually designed with these frames in mind, after I found a 12 pack of them for sale for $10 online.
After doing some online shopping, I had determined that the cheapest place for most of my frames would probably be the dollar store. However, the dollar store I planned to visit only carries frames up to 8x10 in size. So before going to the dollar store, I went to the local crafting supply store for my 11x14 frames. I knew the store was having a sale on frames at the time, but I was worried that the frames would still cost more than I really wanted to spend. I got there and scored big -- they had some 11x14 picture frames with a 1.5" border on clearance for 70% off - less than $7 per frame! These frames were black and not too ornamental, which meant they would be pretty easy to match with dollar store frames. Plus, they each came with a mat with an opening for a 8x10 photo, which was exactly what I needed!
From there, it was easy. I went to the dollar store and picked up the 5x7 frames with a 1" border, and my 8x10 frames with a 1.5" border. True to the store's name, these each cost $1.
I also placed my order online for the 5x7 frames with no border. I used the Ship to Store feature. Ship to Store seemed to take forever, but it was free!
Total cost of frames: $36. (The cost was closer to $30 if you consider the fact that I only used 1/3 of the 12 pack of frames I bought online.)
Step 3: Getting the Content
During the design phase, I figured out what size of photos I needed and what orientation (portrait or landscape) I needed. I knew I wanted to use pictures of our family in my gallery wall, but I wanted to include other things as well. I spent a few hours going through all of the pictures my husband and I have taken in the past 6 years and found some great images of nature, city skylines, and intriguing buildings -- mostly pictures that I had completely forgotten that we had.
Since I didn't want to spend a lot of money on design mistakes, I actually went so far as to add each photo I planned to use to the gallery wall layout I had modeled on my computer. During this phase, I realized that I wanted to make most of my photos black and white, while including splashes of color. Doing this step took some time, but it saved me from making color prints of photos that I wanted to have in black and white, and vice versa.
The digital pictures I had on my computer were not perfectly sized to match the 5x7 and 8x10 image sizes I planned to order, so a little picture editing was going to be required. l had ordered prints from my digital camera in the past, and had been disappointed with the auto-crop feature of the service. So this time, I decided to edit all the pictures by hand to make sure that the photos were cropped to my satisfaction.
Once I had the images ready to go, I had to choose a photo printing service to use. The one I had used in the past seemed a bit expensive, so I looked for cheaper options. I read a few reviews, and kept hearing nice things about Winkflash. Most people were happy with them, and their prices were extremely low. This was the first time I had ever used their service, and I have to say that I was impressed overall. The pictures came back looking just like I had expected, and they came very quickly. I think I ordered them on a Thursday afternoon and had them delivered to my house the following Monday or Tuesday.
In all, I printed four 8x10 photos, and fifteen 5x7 photos, plus shipping, for just under $11.
I did have one extra expense associated with the content: I had to put a 5x7 picture in an 8x10 frame, which required me to buy a mat. The mat normally costs around $3.00 at the craft supply store. I happened to have a 40% off coupon, and since I didn't have anything else to purchase at the time, I used my coupon on the mat. So in all, the mat cost me just under $2.
Total cost of gallery content: $13.
Step 4: Hanging the Frames
Hanging the frames was much easier than I had anticipated thanks to a great trick I learned: using wrapping paper. It was especially helpful to use wrapping paper that has grid lines printed on the back of it. This ensured that my gallery layout followed the "design along lines" structure that I had modeled. I won't go into all of the detail of the process here since this isn't really a step-by-step tutorial, but I will summarize because it was so helpful:
- Cut a piece of wrapping paper big enough to accommodate the entire gallery.
- Lay the wrapping paper on the floor, grid-side up. Arrange all the picture frames on the wrapping paper according to the design model.
- Trace each frame outline onto the paper, then mark the paper to show where the hanger(s) for each picture are located.
- Tape the wrapping paper to the wall in the exact position where you want the gallery to be displayed. Use a level to make sure that the paper is straight.
- Install your picture hanging hardware (nails, hanging hooks, whatever) on each mark.
- Remove the tape from the paper and carefully tear the paper off the wall, leaving the nails or hooks in place.
- Hang the pictures.
I was able to find enough nails around the house for all of my frames, so I didn't have to spend any extra money on this step.
Total cost to hang the pictures: $0.

Total Cost
The total cost of the entire project came to $39. The frames were the biggest expense - I spent about $36 on the frames. The content (prints and mats) cost about $13. I even ended up with a couple of leftover prints, so I may be able to save costs on another decorating project in the future. Overall, I am so happy with the results of this project for the money I put into it, and am glad I took the time to do it!